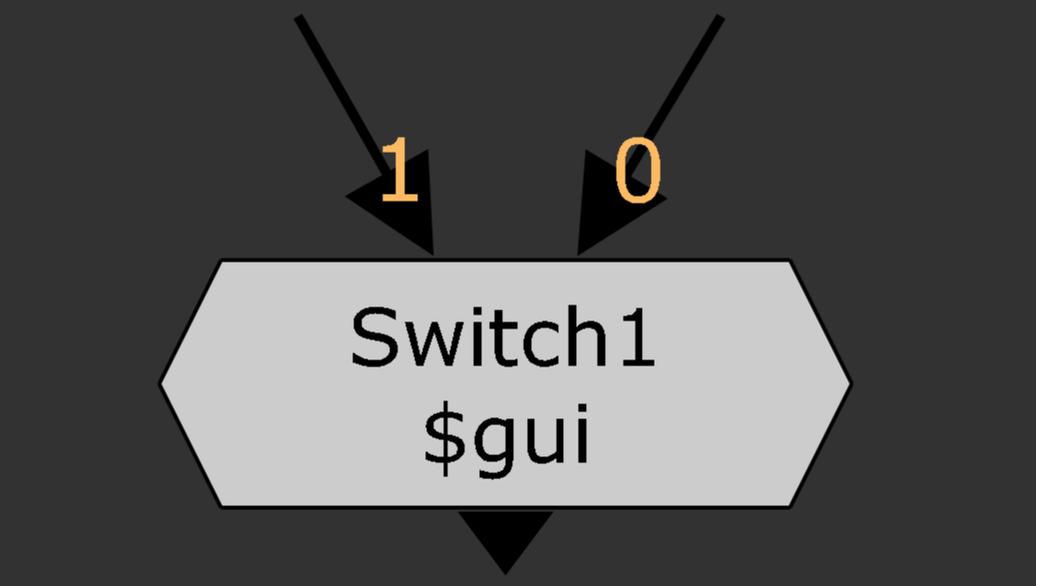
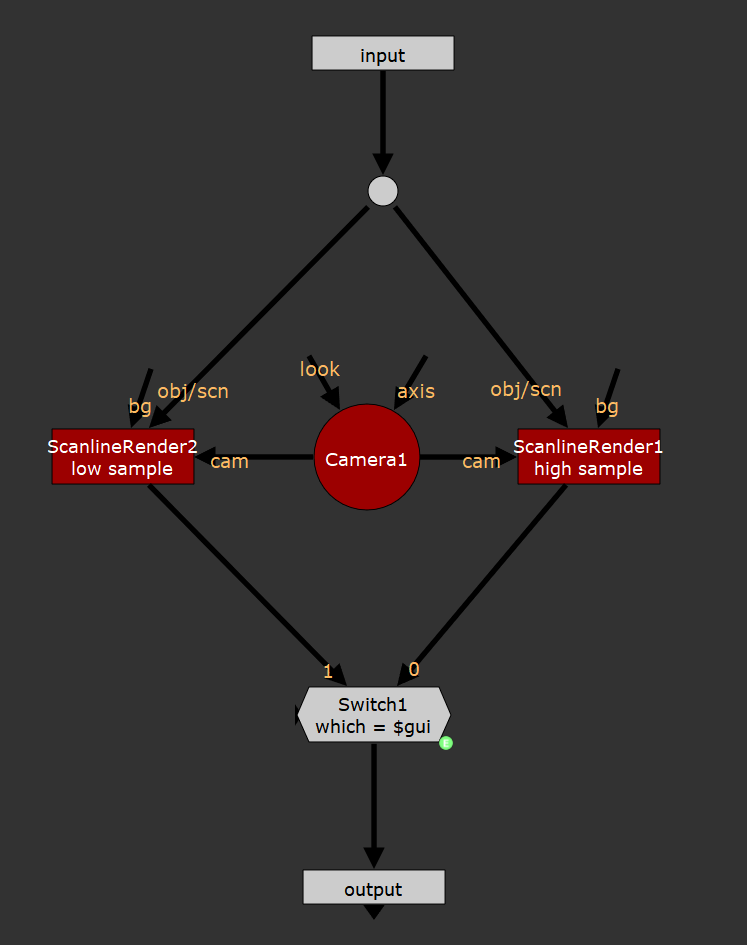
background. Recently, I've been working on comps that required me to use the native Nuke 3D particle system to create a basic simulation to enhance live-action elements in a few shots. I had various particle nodes piping down into a scanline render at the bottom of the comp, before being merged with the background plate. Many compositors are all too familiar in knowing that nodes like the scanline render can easily become like sandbags in your comp. It only takes a few of these nodes to get the machine grinding, especially with high sample counts. The main issue was that when I previewing my work, a low sample count was acceptable to get the gist of what's going on in the shot, but when I sent the render to the farm, I wanted a higher sample count for the final output. I tried a few different methods to help solve this issue such as creating a NoOp adding a slider knob and expression linking every samples slider in every scanline render node to that NoOp. This quickly got messy with expression lines everywhere and I still had to remember to change the value in the NoOp when I was ready to render. Furthermore, this method assumed that all scanline renders would use the same sample count. If I wanted to have a scanline with a different sample count, I'd have to create a new NoOp, link all the values and remember to change that node too at render time. The project lead saw me struggling with this pile of jank and offered up a much simple solution, the $gui expression. the good stuff. This simple TCL expression checks to see if Nuke's GUI is active and returns a boolean value, True if the GUI is active and False if the GUI is not active. When working on the box, the GUI is running and returns True, but when the script goes out to the farm, the GUI is no longer active with a farm license and will return False. This provides an avenue to be able to tell Nuke how to proceed if a shot is being viewed on the box or the farm. We can use an expression in a switch node to swap inputs between a scanline render with low samples and a scanline render with high samples. In the image below you can see the setup I was using for many of the shots on this project. The switch node has the expression '$gui' in the 'which' knob. The switch pipe will be set to 1 when working on my machine because the GUI is active and will return True. This will enable the low sample, faster to preview scanline render. When the shot goes off to the farm, the GUI will no longer be active and the expression will return False and the switch will be set to 0 which enables the high sample scanline render. This solution is faster to preview and easy to read if another artist picks up the shot. The script automatically swaps inputs at render-time so we don't have to be bothered with increasing the sample count before the shot goes to the farm. Furthermore, this allows us to have unique sample counts for each scanline render node if the shot requires. This TCL snippet is not restricted to just the scanline render node, it can be used in any scenario where the user wants to change values in a node at render-time. I find myself using this method often with any node that contains a 'samples' or similar knob; motion blur, transforms, defocus, vector blur, god rays in addition to the scanline render to name a handful. Let's get a tiny bit more technical here. We can apply further boolean logic with TCL to swap samples in a node without the need for the switch node. In the expression editor for a knob a TCL 'if' statement will work just fine in setting knob values that check to see if Nuke's GUI is enabled. The syntax would be as such: Code Editor
Again, with TCL, you can invert the '$gui' expression to get the opposite value using '!$gui'. I find that adding the expression inside the node, as shown above, is a less user intuative solution. If another artist picks up the shot, they may not be able to tell that there is an expression inside the node which could lead to problems when troubleshooting a shot. Nuke scripts are a lot like handwriting, each person has their own unique style but overall your handwriting should be readable to everyone else! Using the switch is a user intuative method with a clear visual language that displays what you've done in your comp to make it work.
I hope this brief write up is helpful. Happy comping!
0 Comments
One of my favorite aspects of nuke is how easily customizable the interface and user experience is. Having only a minuscule amount of programming knowledge in Python can allow you to tailor nuke in fluid way that fits your personal compositing style. The ability to assign custom hotkeys for specific nodes or operations, adding custom menus for tools, and altering the default properties of nodes have helped save me time as well as keep my node graph more readable. The key ingredient to flavoring Nuke to your heart’s content is editing the menu.py file found in your .nuke folder. Foundry’s online learning database for python is an excellent resource to turn towards if you’re unfamiliar with what the menu.py and the .nuke folder and are looking for a way to get the ball rolling.
Additional information: menu.py and init.py files Customizing the UI with menu.py Recently, I registered for Ben McEwan’s Python for Nuke 101 course and quickly learned some simple snippets of python code that have helped me speed up my compositing workflow. I’d highly recommend this course for anyone who’s new to python and integrating it within nuke. The second lesson from the course was focused on adding shortcuts, menus, and default parameters to nodes for nuke and I’d like to share with you some of my new additions to my menu.py after completing this module. These are primarily shortcuts that I’ve thought up recently and they’ve already made an impact in my compositing workflow. You’ll notice that many of the hotkey changes save only a few keystrokes, but in my experience being able to get the information I need in a shorter time, greatly improves my mental flow when compositing. Saving 2 or 3 clicks here and there may not sound like much but the few seconds it takes to open a menu and find the option or value that you’re looking for can add up through the workweek. The more time you save now, the more time you’ll have for getting started on that next shot, learning something new, or drinking beers at the end of the day.
INTRODUCTION
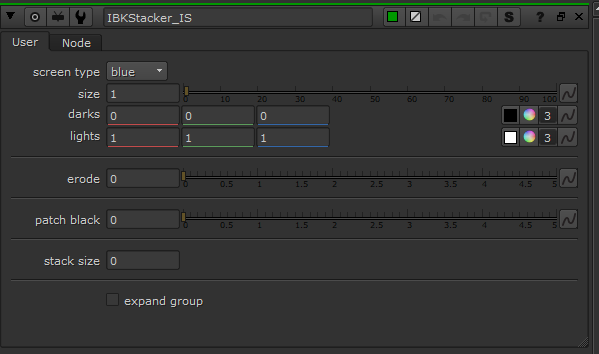
I first learned of the IBK stacked technique from the Compositing Mentor blog at compositingmentor.com. I’m not going to go into meticulous detail on how this works under hood so check out the Compositing Mentor’s blog for more information. In short, stacking IBKColour nodes will likely lead you to a better result than just using a single IBKColour node. This method works by first creating a “main IBKColour” in which the user sets the screen size to a low value (1) and fiddles with the darks, lights, and erode until the subject is covered with black. Then, the user duplicates the main IBKColour, sets the erode to 0 and patch black to 1. The user continues to duplicate the main IBKColour and setting an erode value of 0 and patch black that increases exponentially with each copy (1, 2, 4, 8 etc.)
THE PROBLEM
I was working on a commercial spot that involved heavy amounts of keying with multiple keying setups and found that the process of copy/pasting the IBKColour nodes and adjusting their values was prone to human error and was super time inefficient. So, I challenged myself to create a python script that would automate the stacking process and speed up my work when keying using IBK.
THE SOLUTION
The video below shows how increasing the stack size creates new IBKColour nodes with exponentially increasing patch black values while also keeping the values of other knobs the same. In this example, there are 5 nodes in the stack (IBK01 through 05) with IBK00 being the “main IBKColour”.
The next video shows how the IBKStacker_IS tool creates the same outcome as the large stack of IBKColour nodes. Overall, using this tool can save a few seconds of time when keying but those few extra seconds can add up when you have lots of keying to do or when experimenting with different methods or values.
DOWNLOAD IBKStacker_IS
Add these lines of code to your menu.py file, located in your .nuke folder.
|
|||||||||||


